skip to main |
skip to sidebar
Creating Paper Bag Luminarias (Adapted From: Holiday Decorating For Dummies)

Traditionally, luminarias are made of votive candles set in paper bags weighted with sand and placed in rows along walkways, driveways, and even rooftops. You can use them in new ways, however, to light paths, a mantel, or a staircase. Because they're so simple to make, you can use them as projects for children. Light up your nights for the holidays by making some luminarias for your home and customizing them for a specific holiday.
You can decorate, punch, or cut designs from lunch-size paper bags to make holiday luminarias quickly and easily. Use bags in holiday colors (you can find them at party supply stores) to give your luminarias a holiday look. For instant decorating — no embellishments required — use the preprinted themed bags that are often used for holding goodies.
Place one to two inches of sand in the bottom of each paper bag. Nestle a tealight or votive candle into the center of the sand. When you're ready to use your luminaria, just light the wick of the tealight or candle.
Stamping, stenciling, or drawing designs
You can customize plain bags by stamping, stenciling, or drawing designs on them with craft paint or markers. Stencil stars for the Fourth of July, or stamp shamrocks for St. Patrick's Day. A simple drawing of a jack-o'-lantern for Halloween or a stenciled Star of David for a dusk celebration can provide a beautiful way to welcome guests and make any occasion special.
For a simple way to make a luminaria with a complex design, use a computer to print clip art in black ink on plain copy paper. Trim the copy to fit just inside one side of the plain brown bag, and then glue or tape it into place. When you light the luminaria, the black lines of the design show up on the outside of the bag. With this little trick, you can quickly make luminarias that look as if you spent lots of artistic energy on them.
Try to find designs that look like silhouettes or are completely black: They show up better when the luminaria is illuminated.
Perforating designs
When you perforate outlines of designs in your paper bag luminaria, bright pinpricks of light shine through the paper. Perforating outlines of designs in paper is easy. Just follow these steps:
1. Place several layers of folded newspaper on a cutting board.
2. Tape your paper bag, with the bottom flap unfolded, to the newspaper with pieces of masking tape or removable tape.
3. Take a thumbtack and prick evenly spaced holes along the outline of the design, making sure you prick through both layers of the bag.
Cutting out designs
Cutting small designs out of the paper bag will allow a little more light to shine through your luminaria. But remember, when you cut more paper from the bag, you also allow more wind in, making the candle flame more likely to go out.
When cutting out designs, use shapes that are 1 to 1-1/2 inches in size. Anything larger will weaken the structure of the bag, making it more likely to sag.
1. Place several layers of folded newspaper on a cutting board. Tape your paper bag, with the bottom flap unfolded, to the newspaper with masking tape or removable tape.
2. Draw or trace the outline of the design on the bag.
3. Cut out shapes with a craft knife.
If you want to use cookie cutters for patterns or larger motifs, you can use two bags (with one serving as a liner) to give the cut bag strength. This layered effect is very pretty when you use a contrasting colored bag for the inner liner.
Found at the Save-On-Crafts Website
I made these last night as part of my mom's mother's day present. She and Dad are wine people, they enjoy a glass every now and then, and they like the expensive stuff... okay, Dad likes the expensive stuff that tastes like grape (although that's debatable) nail polish remover, and Mom likes the fruity stuff with slightly less alcohol content. But we all like going over to Mom and Dad's, sitting around a bonfire and having a glass of wine, whatever type we all prefer.
How to Make Wine Charms:
Materials: Fig 1.
- Earring Hoops (also known as manipulating hoops) OR Ring Sized Memory Wire.
- Beads. Whatever you want, just try to be sure before you buy that they will fit over your hoops/wire.
- Charms and Split Rings (a.k.a. Jump Rings). If wanted.
- Pliers, needle nosed are the best.
- Wire Cutters, if using memory wire these could be handy to trim the excess.


Steps:
1. If using memory wire, make a loop or hook at one end (I just made hooks and was sure that my beads couldn't slip off). Fig 3 & 4.
2. String on your desired beads / pattern of beads that you wish. Fig 2.
3. Close the open end of your wire / hoop. For memory wire, trim any excess wire if necessary and create a second hook. For Manipulating/Earring hoops, bend the end of the wire to a 90° degree angle so it sticks straight up and will fit into the receiving end. Fig 3 & 4.
4. If Charms are desired: Attach a small jump ring to your charm and then attach the jump ring between the selected beads. This can be done during the stringing process as well, that's when I put mine on.
5. To put the wine charm on a glass, simply slip it around a wineglass stem and close it by putting the stopper piece of wire into the eyelet or your hook into your loop/hook. Fig 5.
Note: If it doesn't want to hold, gently pull the hoop open so that it will have some tension when closed.
I found some very cute (and very tiny) photo frame charms and my local WalMart. I picked these up and printed 1.7cm x 1.4cm photos of the family for Mom's mothers day presents. I put the tiny pictures in and they look gorgeous. I know she'll love them.
Here are some pictures for inspiration:


 My Mood: Pleased
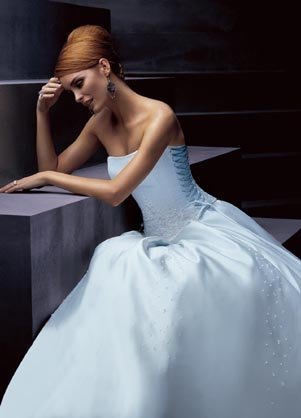
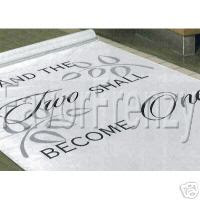
I love the look of these monogrammed aisle runners. Unfortunately, I don't like the prices I find online. But I did find some nice pictures and some ideas from fellow DIYers for making your own.
Custom Aisle Runners

Materials:
- Pre made Aisle Runner. Buy it, or make it yourself too.
- Fabric Paints. Available at almost all craft stores, Walmarts, Kmarts, Target, etc.
- Pre Designed Monogram. Make it yourself or enlist someone to do it for you.
- Printer to print out poster sized monogram, either one large sheet or many 8.5 x 11s.
- Paint Brushes.
- Pencil.
- Paper Towels.
- And from what I hear... Lots of Patience and Time. 2 things I rarely have enough of lol.


Directions:
- Create your monogram using Photoshop, Adobe Illustrator, MS Word, PowerPoint, whatever.
- Blow the monogram up to 3 x3 sheets of 8.5 x 11 paper (or whatever size you are using).
- Tape your 9 pages together and tape them to a large flat surface.
- Position your runner over the pages and secure (tape) down.
- Trace the outline with your pencil.
- After the outline is complete, Lay paper towel under the runner before painting to try to ensure the paint doesn't seep through onto your surface.
- Fill in the outline with fabric paint. You may need to use different sized brushes to get the best results.
- After you finish painting, allow to dry, roll back up and get ready for everyone to love it on your big day.
Notes:
For Quotes and Inspiration please visit:
Aisles with Style. They will custom make your runner for anyone who is not into DIY projects, but I found some great inspiration from their site.
Personalized Aisle. She originally posted a DIY Instruction for this, but she has since began taking orders from other brides. Visit her, the top 3 pictures are from her site and she does gorgeous work.
Don't limit yourself to only monograms or names, use quotes, put a quote at one end of the runner with your monogram (if desired) in the middle.
I am thinking of putting our monogram and a quote on ours. I think I'll put the quote in the middle, and our monogram at the top, just a few feet in front of where we will stand.
Other Examples:
These are ones that can be ordered, but may provide some inspiration. The ones above are homemade DIY projects posted by other brides.


My Mood: Surprised 
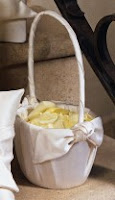
Call me cheap, call me cost conscious, just don't call me someone who throws their hard earned money away. I've been thinking again, this time about flower girl baskets. Now, I couldn't even comprehend it when I saw prices ranging from $10 (very reasonable, but typically very plain, almost blah) to $40 + for anything relatively ornate. My God who can justify that? I've searched the internet for DIY instructions, but really didn't come up with anything other than find a small basket, wicker, cloth, plastic, whatever you want, and decorate it with paint, cloth, lace, ribbon, flowers, charms, beads, whatever you want. Aye Aye, Will Do, No Problemo.
Now I just have to brag for a moment, because I found a real steal, and really didn't even realize it immediately. Lol. We were out and about doing some shopping and decided to look through the Easter clearances to find some cheap toys for our puppy. Jessie will go through a stuffed toy in roughly 45 seconds, from fully intact to mountains of fluff and slobbery "stuffed animal carcass" pieces, but they are her favorite things and long after the fluff is gone to the garbage, the "carcass" lives on for quite sometime. But you don't want to buy her anything that costs more than a buck or two.
We found a few ranging from $0.24 - $0.89 in the clearance bins. Including one Bunny which was attached to a small colorful wicker basket for $0.65. So once we were home we cut the string tying the bunny into the basket, and the dog loved her new toy... briefly. But what to do with this damned basket... LIGHTBULB!! Into the closet it went and I'll decorate it at a later date for my flower girl basket.
Bingo Bango. And now I can have a basket that looks however I want it to look.
Here are some cute ones I've found in my searches for a little inspiration:


My Mood: Blank