skip to main |
skip to sidebar
Tips on making your own aisle runners from DIYBride members:
From Dani "I bought 8 yards of a white cotton fabric. I took the monogram image that I had made on my cocktail napkins and had it enlarged at Kinkos. I took that image and traced it onto the fabric. I then took fabric paint and painted in the letters. If you were to do this I would suggest using fabric paint pens rather then paint and a brush, it was hard to use. I then lined the edges of the "runner" with black satin ribbon for the finishing touch. Since I used paint and a brush I have a few drips. I took some fabric rose petals and hot glued them over my mistakes, once the fresh rose petals are down I doubt you will be able to tell the difference, and that way my mistakes will never be known. Good luck."
From Zoe: Same as Dani, but instead of tracing, we're cutting out the monogram like a stencil, placing over the runner, and spray-painting. FI has advised that acrylic paint will work best on a vinyl runner, so it can be rolled back up. Acrylic is more flexible. Another suggestion: use spray-glue over stencil, then sprinkle with glitter or rose petals. That part of the runner may not roll back up, but it would be a neat look."
My Mood: Inspired 
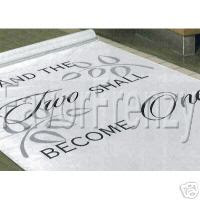
I love the look of these monogrammed aisle runners. Unfortunately, I don't like the prices I find online. But I did find some nice pictures and some ideas from fellow DIYers for making your own.
Custom Aisle Runners

Materials:
- Pre made Aisle Runner. Buy it, or make it yourself too.
- Fabric Paints. Available at almost all craft stores, Walmarts, Kmarts, Target, etc.
- Pre Designed Monogram. Make it yourself or enlist someone to do it for you.
- Printer to print out poster sized monogram, either one large sheet or many 8.5 x 11s.
- Paint Brushes.
- Pencil.
- Paper Towels.
- And from what I hear... Lots of Patience and Time. 2 things I rarely have enough of lol.


Directions:
- Create your monogram using Photoshop, Adobe Illustrator, MS Word, PowerPoint, whatever.
- Blow the monogram up to 3 x3 sheets of 8.5 x 11 paper (or whatever size you are using).
- Tape your 9 pages together and tape them to a large flat surface.
- Position your runner over the pages and secure (tape) down.
- Trace the outline with your pencil.
- After the outline is complete, Lay paper towel under the runner before painting to try to ensure the paint doesn't seep through onto your surface.
- Fill in the outline with fabric paint. You may need to use different sized brushes to get the best results.
- After you finish painting, allow to dry, roll back up and get ready for everyone to love it on your big day.
Notes:
For Quotes and Inspiration please visit:
Aisles with Style. They will custom make your runner for anyone who is not into DIY projects, but I found some great inspiration from their site.
Personalized Aisle. She originally posted a DIY Instruction for this, but she has since began taking orders from other brides. Visit her, the top 3 pictures are from her site and she does gorgeous work.
Don't limit yourself to only monograms or names, use quotes, put a quote at one end of the runner with your monogram (if desired) in the middle.
I am thinking of putting our monogram and a quote on ours. I think I'll put the quote in the middle, and our monogram at the top, just a few feet in front of where we will stand.
Other Examples:
These are ones that can be ordered, but may provide some inspiration. The ones above are homemade DIY projects posted by other brides.


My Mood: Surprised